mgdes
Membre
- Inscrit
- 16 Octobre 2011
- Messages
- 2 180
- Points
- 38
- #1

Merci à
S'il vous plaît,
Connexion
ou
S'inscrire
pour voir le contenu ou les urls !
Je remercie mon ami Coyote pour la mise en page de ce post :super:

Cette opération comporte des risques. Ni moi ni Phonandroid ne peuvent être tenu responsables des éventuels problèmes rencontrés. Pensez à effectuer une sauvegarde de votre système et EFS avant toutes modifications ou flash !
Samsung S7edge G935F

Fonctionnel :
- Camera
- Camcorder
- Wifi
- Sound
- mali drivers
- USB tethering
- Video Playback
- Fingerprint Sensor
- Ril (Mobile data,calls, sms and stuff)
- Sensors
- Buttons and their backlight
- Bluetooth
- Wifi HotSpot
- MTP
- 2D and 3D gpu acceleration
- Stuff I didn't test yet
Non fonctionnel :
- Device only GPS (Gps in general should work tho)
- HW acceleration in video playback
- Stuff I didn't test
Changelogs :
26.03.2018.
- Switched to a new camera app
- Added 4k recording profiles for other camera apps
- Stability improvements
- Synced with LOS source
20.03.2018.
- Fixed issues introduced in previous build
19.03.2018.
- Fixed key configuration
- Switched adb to FlashFS interface from legacy
- Fixed issues with accelerometer auto rotation
- even more OMX improvements
- synced kernel defconfig with android-3.18-o-mr1 recommended config
- Improvements to fingerprint sensor hal
- audio and ril improvements (Microphone wont get muted in call anymore) and ril hal has been cleaned up
- Resolved out of memory issues with dalvik/art config which caused around 99% of random reboots
(Note biggest gapps you should ever use with rom are micro there are issues with gapps themselves)
- enabled and fixed sdcardfs (This should improve internal storage rw speed)
04.03.2018.
- Added samsungs sdfat filesystem to support exFAT formated sd cards
03.03.2018.
- Fixed charging with device powered off
- Resolved conflcts with OpenGapps
- Added support for korean device variants
- Improved stability of OMX
- NFC chip firmware now updates to latest provided firmware from drivers
- Imrpovements to audio and ril hal (Check my github if you really want to know)
- system partition now mounts early in boot proces (Should speed up boot a bit)
- Fixed delay when turning on torch
- Fingerpeint sensor doesnt look for fingerprint while screen is off anymore(Moar battery and it was unreliable
- Synced with LOS source
22.02.2018.
- Fixed HW encoding/decoding (finally)
- Fixed most of the remaining random reboot issues
- Updated media profiles and codecs config (More file formats should play now)
- Synced with LOS source
14.02.2018.
- fixed apn for MMS on some dual apn carriers
- Boosted micrphone volume
- Moved from staging/lineage-15.1 to stable branch
- Added lineage overlays for dark UI
- Synced with los source
01.02.2018
- Fixed hardware compass
- added back some HRM sensor permissions
- Added toggle for button backlight
- Fixed key disabler reseting after reboot
- Merged latest LOS source
22.01.2018.
- Audio and bluetooth hal imporovements
- Fixed LED notification light on charging and other events
- Fixed vibrator intensity changing
- Added smart dimming aka Flicker free mode to kernel ( use "echo 1 > /sys/class/lcd/panel/smart_on" to enable it, its disabled by default)
- Added advanced reboot
- Added button settings and button disabled
- Synced with LOS source (Quite a few new features have been added to LOS since last update)
09.01.2018.
- Improvements to bluetooth and audio hal
- Synced with LOS source
02.01.2018.
- Synced with LOS source (few new features are implemented to LOS)
- stability improvements
- Switched to linaro for kernel toolchain
- Misc updates and fixes
16.12.2017.
- Fixed random reboots that were present during first boot
- Enabled home button wakeup
- Added more advanced version of the doze
- Misc stability improvements
11.12.2017.
- Switched to staging/lineage-15.1 branch
- Updated device source to work with 8.1
- Fixed sensor issues 8.1 introduced
- Fixed video playback in portrait modei n stock gallery app
- Misc changes and bug fixes
2.12.2017.
- Fixed all graphical glitches that were present in UI elements (Should also fix setup wiz. in some cases)
- Updates to FP hal
- Device tree cleaned up a bit
- Enabled LTE menu when selecting network type
- Misc changes and improvements
27.11.2017.
- Enabled home button wakeup
- APK's can now be installed from stock file manager
- Fixed ril on Dual sim devices (G93*FD)
- Fixed bug where some apps couldnt access internal storage (Messenger,whtsapp,instagram)
- Misc changes and improvements to general system stability
26.11.2017.
- Fixed senors
- Fixed ril
- Misc changes (See git)
25.11.2017.
- First public release

. Avoir activé OEM Unlock--> voir sujet ici et lire >> <<<
. Etre root ( pour backup efs ) et avoir installé le recovery TWRP de votre modéle
. Avoir sauvegardé votre dossier EFS --> (voir tutoriel).
. Avoir une batterie chargée (mini 75%)
. Etre root ( pour backup efs ) et avoir installé le recovery TWRP de votre modéle
. Avoir sauvegardé votre dossier EFS --> (voir tutoriel).
. Avoir une batterie chargée (mini 75%)


S'il vous plaît,
Connexion
ou
S'inscrire
pour voir le contenu ou les urls !
S'il vous plaît,
Connexion
ou
S'inscrire
pour voir le contenu ou les urls !

1- Faire un backup
2- Faire un full wipe
3- Flasher la rom
4- Flasher les gapps
2- Faire un full wipe
3- Flasher la rom
4- Flasher les gapps

1- Copier/coller le fichier zip désiré que vous avez téléchargé dans la mémoire interne de votre téléphone.
2- Téléphone éteint, redémarrer en mode recovery ( volume haut + home + power )
3- Dans le menu qui s'affiche, sélectionnez "Backup" puis choisissez les partitions que vous voulez sauvegarder. Puis Faites glisser votre doigt de la gauche vers la droite sur "Swipe to Back Up" pour commencer la sauvegarde
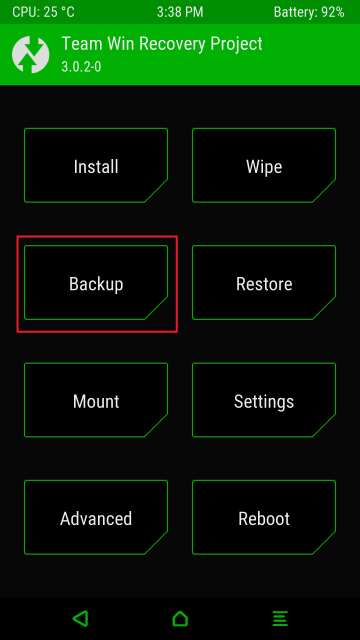
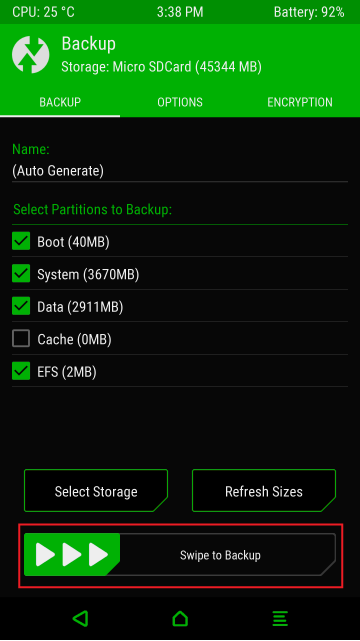


4- Une fois la sauvegarde effectuée, faites retour et allez sur " Wipe / Advanced Wipe" puis séléctionner " Wipe Cache +
Wipe dalvik/ART cache + Wipe Data + Wipe System et faites glisser votre doigt de la gauche vers la droite sur "Swipe to wipe"
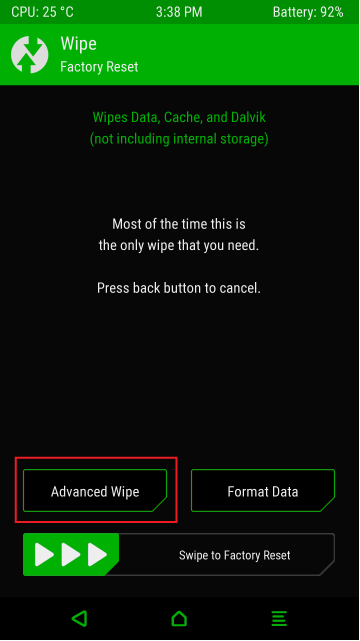
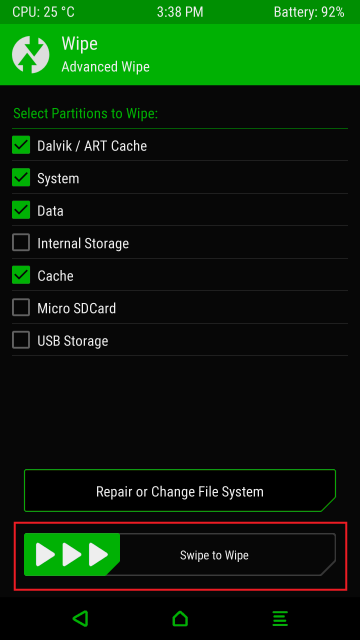
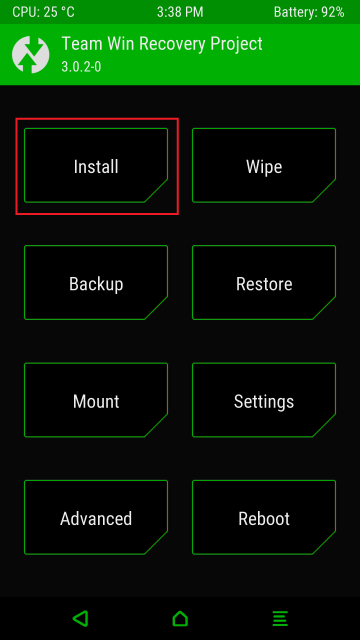
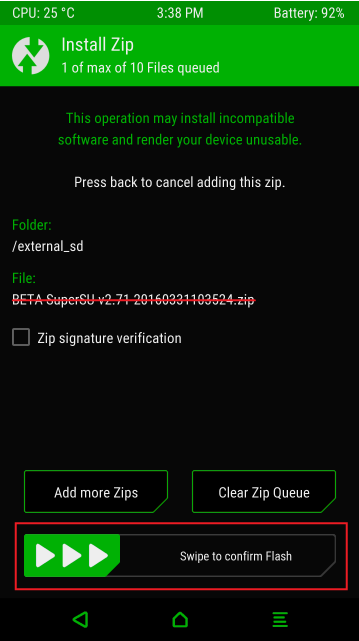
5- Revenez sur le menu principal, puis appuyez cette fois sur "Install". Là, il ne vous reste plus qu'à choisir le fichier de la rom puis le flasher en faisant glisser de la gauche vers la droite le "Swipe to Confirm Flash" !
6- Une fois le flash terminé, faite un wipe Cache puis "Reboot System Now"
Vos retours sont les bienvenus !
